
Developing a Software-as-a-Service (SaaS) platform that serves multiple customers (tenants) from a single application instance requires careful architectural decisions. Multi-tenant architecture can significantly improve cost efficiency and scalability, but it introduces complexity in data isolation, configuration management, and deployment processes. In this article, we provide a comprehensive guide to building multi-tenant SaaS applications using ASP.NET Core (.NET 8 or newer), including tenancy models, tenant resolution strategies, multi-tenant identity management, per-tenant configuration and feature flags, and CI/CD strategies. We will also highlight common pitfalls and best practices for engineers, architects, and engineering managers designing scalable SaaS platforms.
What is Multi-Tenancy in SaaS?
In a multi-tenant SaaS application, a single running instance of the software (or a cluster of instances) serves multiple customers (tenants), with each tenant’s data and often configuration logically segregated from others learn.microsoft.com. Tenants are typically organizations or user groups (for B2B SaaS, a tenant might be a company with multiple users; for B2C, a tenant might be an individual or a defined user group) learn.microsoft.com. This contrasts with a single-tenant model, where each customer gets their own dedicated instance of the application (with its own infrastructure and database). Multi-tenancy allows better resource utilization and easier centralized management, at the cost of added complexity to ensure isolation and security between tenants.
Key challenges in multi-tenant systems include maintaining data isolation (so one tenant never sees another’s data), preventing performance interference (the “noisy neighbor” problem where one tenant’s heavy usage affects others), providing per-tenant customizations or feature variations, and managing deployments and upgrades in a way that minimizes impact across tenants. We will address these challenges step by step.
Overview of Tenancy Models
One of the first architectural decisions is choosing a tenancy model – how tenants’ data and components are isolated or shared. Tenancy models range on a spectrum from fully isolated single-tenant deployments to fully shared multi-tenant deployments, with hybrid approaches in between. The appropriate model depends on factors like security/compliance requirements, cost considerations, number of tenants, and scalability needs. Let’s explore the common tenancy models and their pros, cons, and ideal use cases.
Single-Tenant (Dedicated Instances per Tenant)

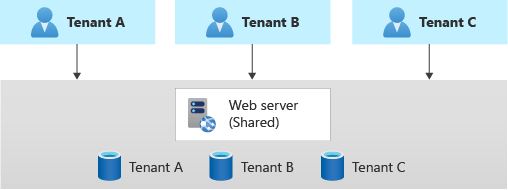
In a single-tenant architecture, each tenant has a dedicated deployment of the application (often including dedicated database and possibly separate infrastructure). Essentially, Tenant A, Tenant B, Tenant C, etc., each run their own copy of the software on isolated resources (as illustrated above). This model maximizes isolation: data never co-mingles, and each tenant’s load is handled by separate resources, eliminating noisy-neighbor effects. It is often chosen by customers with strict compliance or security needs, or when tenants are large enterprises requiring custom configurations and guaranteed performance isolation.
Pros:
- Strong Isolation: No shared components means risk of data leakage or cross-tenant impact is minimal. Compliance requirements for data separation are easier to meet. Performance issues in one tenant’s instance do not affect others.
- Customizability: Each tenant’s deployment can be customized (different versions, custom extensions, regional deployment, etc.) without affecting others.
- Independent Upgrades: You can roll out updates to one tenant at a time or on separate schedules, reducing the risk of a bad deployment taking down all customers. Issues can be isolated to a single tenant’s environment.
Cons:
- High Cost: This model is resource-intensive. If one tenant requires X amount of resources, N tenants require N·X resources (no economies of scale). Infrastructure cost grows linearly with number of tenants learn.microsoft.com. For example, 100 tenants likely means ~100× the cost of one, which is often not cost-efficient for small or medium tenants.
- Operational Overhead: Maintaining many separate deployments is complex. Updates and fixes have to be deployed to each instance, which can be time-consuming (though automation can help) learn.microsoft.com. Monitoring and managing many environments (e.g., ensuring all are patched, handling many databases) can strain operations teams learn.microsoft.com.
- Scalability Limitations: If the number of tenants grows large, managing a fleet of deployments may become unsustainable unless highly automated learn.microsoft.com. Hitting cloud service quotas is possible if each tenant has separate resources in the same subscription learn.microsoft.com.
Use Cases:
Single-tenant deployments are ideal when each tenant is large or has unique needs that warrant isolation. Enterprise SaaS products often offer a single-tenant (or dedicated hosting) option as a premium tier for customers requiring data residency, custom release schedules, or enhanced security isolation. It’s also suitable if you only ever expect a handful of tenants – for example, a SaaS serving a few large organizations might feasibly maintain separate instances for each. In fact, guidance suggests if you expect only a few tenants (customers) in total, a single-tenant approach might be appropriate (despite the cost) to meet isolation needs learn.microsoft.com. Just be sure to automate deployment and management (using Infrastructure as Code scripts, container orchestration, etc.) if you pursue this model, to handle the maintenance burden learn.microsoft.com.
Real-world tip: Some SaaS providers employ the Deployment Stamps pattern learn.microsoft.com – provisioning dedicated infrastructure stamps for specific tenants or groups. Lighter-weight tenants may share a deployment stamp, while heavy tenants get their own (we’ll discuss such hybrid partitioning later). This approach can combine the benefits of isolation for those who need it with shared deployments for others.
Fully Shared Multi-Tenant (Single Deployment for All Tenants)

At the opposite extreme, a fully multitenant model puts all tenants into a single logical deployment. The application and resources are shared among all customers learn.microsoft.com. For example, one ASP.NET Core web application (scaled out as needed) serves requests for every tenant, and a single database contains the data for every tenant, usually distinguished by a Tenant ID column on each table. This model is the most cost-efficient, as you have only one set of infrastructure to manage and pay for, amortized across all tenants learn.microsoft.com.
Pros:
- Cost Efficiency: Shared resources reduce overall cost. Even if you need to scale up to a higher SKU to support many tenants, it’s often cheaper than running many small isolated instances learn.microsoft.com. For example, one large database serving 100 tenants might be far cheaper than 100 separate small databases each underutilized.
- Simplicity of Deployment: Only one deployment (one codebase version in production) to manage makes CI/CD straightforward. Updates, bug fixes, and feature releases are deployed once to affect all tenants learn.microsoft.com. There’s no need to coordinate multiple parallel deployments.
- Easier Global Analytics: All tenant data in one place can simplify reporting across tenants (though you must still scope by tenant in queries). Also, if a user or entire tenant needs to migrate data (say, move from one region to another or even merge tenants), it can be as simple as updating a tenant identifier on data rather than physically migrating databases learn.microsoft.com.
Cons:
- Data Isolation Risks: The application must ensure strict data partitioning in software. Every database query and every in-memory operation needs to properly filter or segregate by tenant. A single bug in authorization or a mistaken query can lead to one tenant seeing another’s data – a serious breach. Robust testing and safeguards (like global query filters, which we discuss later) are essential learn.microsoft.com.
- Noisy Neighbor & Performance Contention: Since tenants share components, a high-traffic or misbehaving tenant can impact others. For example, one tenant running an expensive query could consume database CPU/IO and slow down others learn.microsoft.com. Throttling and workload isolation strategies (like per-tenant resource quotas or separate resource pools within the DB) may be needed to mitigate this.
- Global Impact of Changes: A code change or deployment issue affects all tenants at once. There’s risk in updating the single shared system – a bad deployment or migration could produce a system-wide outage learn.microsoft.com. It requires confidence in testing and often deploying updates in off-hours or using safe deployment practices (like blue-green or canary releases) to reduce risk.
- Scale Limits of Shared Resources: Eventually, a single deployment might hit scalability limits. For instance, a single database can handle only so many requests per second or so much storage; as tenant count and usage grow, you might approach cloud resource limits learn.microsoft.com learn.microsoft.com. Scaling beyond a point might force architectural changes (sharding the database or splitting tenants across multiple instances as described below).
Use Cases:
Fully shared multi-tenancy is beneficial for large-scale, multi-customer SaaS where cost per tenant must be low (e.g., self-service B2B SaaS with hundreds or thousands of small tenants, or consumer apps with many users grouped as tenants). If all tenants can be on the same software version and have similar needs, and especially if each tenant’s usage is moderate, this model yields the best economics. Startups often begin with a shared model to maximize efficiency and only introduce more isolation as needed. However, it’s critical to design the software with multi-tenancy in mind from the start – adding tenant isolation into an application later can be very difficult. Implementing this model means carefully handling every request and data access to include the tenant context (we will cover strategies for tenant resolution and data isolation in the next sections).
Hybrid and Intermediate Models: Many SaaS solutions choose something between these two extremes to balance trade-offs learn.microsoft.com. Next, we’ll discuss two common intermediate approaches: schema-per-tenant (or database-per-tenant) and mixed/hybrid isolation, which partition resources partially.
Schema-per-Tenant (Shared Database, Separate Schemas)
In a schema-per-tenant model, all tenants reside in the same database server but each tenant’s data is in a separate schema or set of tables within that database. For example, Tenant A’s tables might be prefixed or under schema TenantA, Tenant B under schema TenantB, etc. This provides a middle ground between sharing everything and having separate databases.
How it works: The application at runtime chooses the schema (or table set) based on the current tenant. With Entity Framework Core, for instance, you could dynamically set the schema for the model at runtime or use separate DbContexts per schema. Alternatively, one might generate separate tables for each tenant (e.g., Orders_TenantA, Orders_TenantB), though that approach can become unwieldy with many tenants. More commonly, schemas are used to logically group a tenant’s tables.
Pros:
- Data Isolation: Separate schemas mean tenant data is not intermixed in the same tables. This can reduce risk of accidental data leakage via incorrect queries (though one must still be careful to query the right schema). It also allows per-tenant backup/restore at the schema level if the database supports it (or at least easier export/import of one tenant’s data).
- Some Customization: You can allow differences in schema structure per tenant if absolutely required (e.g. Tenant A’s schema has an extra column or table that others don’t). This is not usually recommended, but the schema model does permit per-tenant extensions more readily than shared-table model code-maze.com. It’s noted that schema isolation is useful when tenants have significant variations in their data models code-maze.com.
- Moderate Operational Complexity: Compared to managing entirely separate databases for each tenant, using schemas means you’re still dealing with one database instance (connection string) per environment, which can simplify configuration. Tasks like running migrations can potentially target all schemas in one run (with custom scripting) and you avoid the overhead of maintaining numerous database servers or accounts.
Cons:
- Database Limitations: All schemas still live on one database server, so you’re limited by that server’s resources (CPU, memory, I/O) and size. If one tenant causes heavy load on the database, it can affect others (noisy neighbor still a concern). You don’t get full isolation of performance or fault domains like you would with separate DB servers.
- Complex Migrations: Keeping schemas in sync can be complex. If you change the data model (add a column, etc.), you need to apply that change to every tenant’s schema. Automation is required to iterate schema changes across all schemas. If a tenant’s schema was allowed to diverge for a custom need, applying global changes becomes even more complicated.
- Number of Tenants Limit: Some database systems have limits on number of schemas or may experience performance issues with too many tables/schemas. Hundreds of schemas might still be fine on SQL Server, but thousands could become problematic to manage. Also, connection pool and memory usage on one DB server grows with number of tenants sharing it.
- Security: Proper access control must be in place to ensure queries for one tenant cannot accidentally reach into another schema. This typically means the application uses a single database login that has access to all schemas, so the protection relies entirely on application logic to select the correct schema – similar to the shared-table approach in terms of relying on app discipline.
Use Cases:
Schema-per-tenant is less common than the other models but can be useful when you want to leverage a single database’s manageability (backup, monitoring) while still achieving some data separation. It might be chosen if the number of tenants is modest and each tenant’s data volume is large enough to warrant separate tables for manageability. For example, a SaaS with 50 medium-sized enterprise tenants might use one database with 50 schemas – this avoids 50 separate database servers, but still gives each tenant essentially their own set of tables. If one tenant needs a restore or moves away, you could more easily extract their schema. This model is also seen as a stepping stone: starting with shared tables and moving to separate schema can be a way to incrementally increase isolation without a full redesign.
Example: Imagine a SaaS where two large clients have slightly different data requirements. With schema-per-tenant, you could maintain two slightly different sets of tables. However, each new fork in schema increases maintenance complexity greatly, so it should be used sparingly. In general, try to keep the schema structure uniform across tenants even if using separate schemas for isolation. The schema-per-tenant approach is essentially a specific case of the next model (database-per-tenant) but using schemas instead of entirely separate DBs, so many considerations overlap.
Database-per-Tenant (Separate Database for Each Tenant)
In the DB-per-tenant model, each tenant’s data is stored in a separate database (or separate database instance/server). The application is common (shared web app/API), but it connects to different connection strings depending on the tenant context. This is a prevalent approach for many SaaS applications because it offers a strong isolation of data with less overhead than full stack isolation.
Pros:
- Data Isolation and Security: Each tenant’s data resides in a separate database, so by design no data is intermingled. The risk of accidental cross-tenant data access is greatly reduced (the app would have to connect to the wrong DB to leak data, which is an obvious logic error). It’s easier to satisfy stringent security demands – for example, if a customer requires their data in a separate database for compliance, this model inherently provides that.
- Mitigates Noisy Neighbors on DB: One tenant’s expensive queries or large data volume will mainly impact their own database. Other tenants with their own databases are unaffected by DB-level locks, I/O spikes, or table scans in a single tenant’s DB learn.microsoft.com. This addresses one of the biggest bottlenecks (the data layer) and can improve overall performance stability.
- Independent Scaling of Data Tier: You can provision different performance tiers per tenant. For instance, a high-end customer can be given a larger or more performant database instance, while smaller tenants share a less costly pool. It’s also possible to distribute tenant databases across multiple servers or clusters if needed (sharding tenants among database servers).
- Ease of Per-Tenant Maintenance: Operations like backup, restore, exporting data, or moving a tenant to a different server become easier. If Tenant X needs a point-in-time restore, you can restore their database without affecting others. If a tenant leaves, you can simply drop their database. Schema changes can be rolled out gradually: you could upgrade one tenant’s DB schema at a time if needed (though usually you’d automate upgrading all).
- Azure SQL Elastic Pool & Other Tools: Cloud platforms provide tools to manage many databases efficiently. For example, with Azure SQL Database, you can use Elastic Pools to group many tenant databases and share compute resources cost-effectively syncfusion.com. An elastic pool allows up to 500 databases to share a pool of resources – idle databases consume minimal resources and active ones draw more as needed, smoothing out utilization. This model helps reduce cost in a DB-per-tenant architecture by avoiding worst-case provisioning for every tenant.
Cons:
- Higher Number of Resources: Managing potentially hundreds or thousands of databases can be challenging. Each database might need connection strings, migrations, monitoring, etc. The app must dynamically select the right connection for a given tenant. You need a strategy to catalog these connection strings securely (often a master tenant registry).
- Deployment Complexity: Schema changes (migrations) must be executed for each database. If you have 100 tenant DBs, deploying a new version that changes the schema means running 100 migrations. Automation is a must – for instance, running Entity Framework Core migrations in a loop for each tenant’s connection or having a centralized updater service. Ensuring all tenant databases stay in sync with the application version requires careful orchestration. We will discuss strategies for handling multi-DB migrations in the CI/CD section.
- Cost for Many Small Tenants: If each database has fixed overhead, having many tiny tenants could lead to wasted resources. Using pooling (like Azure Elastic Pool) mitigates this by sharing compute, but there may still be per-database costs (e.g., if each database needs a minimum storage or if each counts toward certain limits). On-premise or IaaS scenarios might require hefty servers to house many DBs.
- Limited by DB Technology: Some database engines are better suited for this than others. Using a cloud-managed database service (like Azure SQL, AWS RDS) makes it easier. If using something like PostgreSQL, note that each database cluster can hold many databases, but you might then face limits at the server level (like max connections across all). It’s important to ensure your database server or service can handle the count of tenant databases you anticipate.
- Cross-Tenant Analysis Harder: If you want to run a query across all customers (for analytics or admin purposes), separate databases make that more involved – you’d have to query each DB individually and aggregate results, or use a data warehouse pipeline to gather data centrally. In a single-DB model, a single SQL query could compute a result partitioned by tenant (though that has its own performance issues at scale). In practice, many SaaS products solve this by exporting tenant data to a central analytics database if cross-tenant analysis is needed.
Use Cases:
Database-per-tenant is a popular choice for B2B SaaS with a moderate to large number of tenants, where each tenant’s dataset is significant enough to warrant isolation, and tenants may have varying usage patterns. It strikes a balance by sharing the application tier (so you still have one deployment of code) but isolating data per tenant. This model is especially attractive if you plan to leverage cloud database features like elastic pools or if you foresee needing to give certain tenants special treatment (e.g., premium tenants on a high-performance database). Microsoft’s guidance notes that this approach can help mitigate noisy neighbour problems by isolating the load-heavy component (the database) per tenant learn.microsoft.com. Indeed, many well-known SaaS platforms use a form of DB-per-tenant under the hood once they reach a certain scale of customers.
Hybrid and Partitioned Approaches: It is common to mix models. For example, you might run many tenant databases in one server or pool (to save cost for small tenants), but put very large tenants on their own dedicated database server or cluster. Or you might use a shared database for low-tier customers and give higher-tier customers their own DB (this is a form of vertical partitioning by tenant tier) learn.microsoft.com. Another scenario is geo-partitioning: having multiple deployments in different regions, each housing some tenants, perhaps with DB-per-tenant within each region learn.microsoft.com. We’ll discuss such hybrid deployment patterns next.
Hybrid Models (Mixed Isolation)
Many SaaS architectures end up using a mix of the above strategies to balance cost and performance for different tenant needs. Two hybrid patterns are commonly referenced:
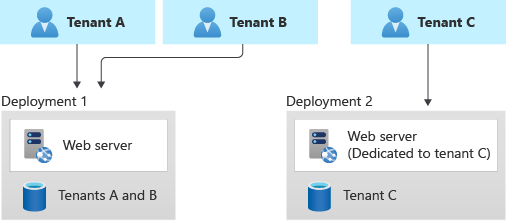
- Vertically Partitioned (Tiered Isolation): Some tenants share infrastructure, while others are isolated. For example, you could keep most customers on a shared multi-tenant deployment but provide a dedicated instance for a large enterprise tenant that demands it learn.microsoft.com. The figure below illustrates this approach.
In this model, you might charge higher fees for a dedicated environment, offsetting the cost learn.microsoft.com. It’s effectively running both multi-tenant and single-tenant models side by side. The challenge here is maintaining a single codebase that can be deployed in both modes (shared or dedicated) without branches. Ideally, the software doesn’t fundamentally change – it’s just configuration whether a particular deployment serves one or many tenants. But you must manage things like ensuring your tenant routing directs Tenant C’s users to Deployment 2 in the above example, while Tenants A and B go to Deployment 1. Often a tenant mapping service or DNS configuration handles this (e.g., Tenant C might have a custom domain pointing to their dedicated instance). We’ll touch on routing in the next section. - Horizontally Partitioned (Component Isolation): This pattern isolates one layer of the stack per tenant while sharing others. The most typical example is the shared app, separate databases approach we already covered (that is horizontal partitioning of the data layer) learn.microsoft.com. Another example could be separate storage accounts per tenant for files, but a shared application server, etc. Essentially, you identify which component is most strained by multi-tenancy and split that out per tenant. By doing so, you reduce the chance that one tenant overwhelms that component for others learn.microsoft.com. The database-per-tenant model is exactly a horizontally partitioned deployment as defined in Azure’s guidance learn.microsoft.com. You could take it further: for instance, each tenant could have a separate cache instance or separate message queue, while still using the same app servers. Each additional isolated component adds cost, so often it’s a selective choice. A common compromise is to use shared app servers and perhaps a shared primary database for simple reference data, but give each tenant their own database for critical transactional data. Or in a microservices architecture, maybe the multi-tenant core service is shared, but a heavy analytics service has per-tenant data stores.
Choosing a Model: Selecting the right tenancy model is both a technical and business decision learn.microsoft.com. Consider: How many tenants do you expect and how large are they? What isolation do your customers demand or will they accept? Will they pay more for isolation? Can your ops team handle many deployments or do you need to maximize automation? learn.microsoft.com Often, a fully shared model is best to start with for efficiency, and you introduce more isolation as you scale and as specific customers require it. Many SaaS platforms support multiple models simultaneously (e.g., a standard multi-tenant cloud offering and a premium dedicated offering). Just remember that any increase in isolation usually comes with an increase in complexity somewhere – be it deployment, operations, or development complexity – so justify it with clear needs (performance, compliance, or customer contractual requirements).
Tenant Resolution Strategies in ASP.NET Core
Once you have the overall data architecture decided, the next fundamental challenge is how to identify which tenant a given request belongs to. The application needs to resolve the tenant context for each incoming request before it can route to the correct logic or data store. In ASP.NET Core, there are several common strategies for tenant identification:
- Subdomain per Tenant (tenant in the hostname)
- Path or URL Segment (tenant in the URL path)
- Query String or Header (tenant passed as a parameter or header)
- Based on User Identity/Claims (tenant inferred from logged-in user’s claims)
Each strategy has pros and cons, and they are not mutually exclusive (some apps use a combination). We will describe each and how you might implement it in ASP.NET Core.
Subdomain per Tenant (Hostname Strategy)
A popular approach is to assign each tenant a unique subdomain, e.g. tenant1.example.com, tenant2.example.com, etc. The application then examines the Host header of the HTTP request to determine the tenant. This provides a clean separation at the DNS level and is user-friendly (tenants often like to see their name in the URL).
Implementation: In ASP.NET Core, you can use middleware or the routing system to map hostnames to tenants. For example, you might write middleware that runs on each request, parses HttpContext.Request.Host to extract the subdomain, and then looks up the corresponding tenant in a registry. A simple example using middleware:
csharpCopyapp.Use(async (context, next) =>
{
    string host = context.Request.Host.Host;              // e.g. "tenant1.example.com"
    string subdomain = host.Split('.')[0].ToLower();      // "tenant1"
    // Resolve tenant by subdomain
    var tenant = tenantService.GetTenantBySubDomain(subdomain);
    if (tenant == null)
    {
        // Handle unknown tenant (e.g., 404 or redirect to a generic site)
        context.Response.StatusCode = 400;
        await context.Response.WriteAsync("Unknown tenant");
        return;
    }
    // Store tenant info for later use (e.g., in HttpContext.Items or a scoped service)
    context.Items["Tenant"] = tenant;
    // Continue to next middleware
    await next.Invoke();
});
The above snippet conceptually illustrates capturing the subdomain. In a real app, you might integrate this with a library or framework. In fact, the Finbuckle.MultiTenant library for .NET provides a WithHostStrategy() that simplifies subdomain resolution by configuring a wildcard host pattern and mapping to tenant identifiers blazor-boilerplate.readthedocs.io. But even without a library, the logic is straightforward: split the host by . and use the first part as the tenant identifier to look up your tenant configuration (e.g., database connection string, name, theme, etc.). The code excerpt below (adapted from an example) demonstrates extracting the subdomain and looking up the tenant:
Once the tenant is identified (here via GetTenantBySubDomain), you typically store it in a scoped service or context that can be injected into controllers, DbContexts, etc. For example, you might have ITenantProvider that returns the current TenantInfo. This can be set in the middleware after lookup.
Pros: Using subdomains provides a clear separation. Cookies by default won’t be shared across different subdomains (unless you set a common parent domain), which is often desirable for separate tenant sessions. Tenants can have distinct URLs and even SSL certificates or custom domains (you could allow a tenant to CNAME their own domain to your subdomain). It’s also SEO-friendly if relevant (for content partitioned by tenant). From an implementation standpoint, the host is always available early in the pipeline, even before routing, so you can resolve the tenant very early. This strategy also works nicely in API scenarios where each tenant’s API endpoint is separate.
Cons: It requires wildcard DNS and potentially wildcard TLS certificates (or a strategy to provision certificates for each tenant’s subdomain). Local development can be awkward (you might need to set up /etc/hosts entries or use a local wildcard DNS like *.localhost). If your SaaS is delivered over a single domain for all (for example, due to corporate policies or simpler DNS), subdomains might not be feasible. Additionally, if a user belongs to multiple tenants, switching subdomains means a new session (which might actually be considered a pro from isolation standpoint).
Path Segment per Tenant
Another approach is to include the tenant identifier as part of the URL path, for example: example.com/tenant1/dashboard or example.com/{tenantId}/.... The application can parse the first segment of the path to determine the tenant.
Implementation: This can be done via ASP.NET Core’s routing. You might define routes like "{tenant}/Home/Index" in MVC or use a global route prefix. Another method is custom middleware that peeks at Request.Path and extracts the tenant segment. For instance:
csharpCopyapp.Use(async (context, next) =>
{
    var path = context.Request.Path;
    var segments = path.Value.Split('/', StringSplitOptions.RemoveEmptyEntries);
    if (segments.Length > 0)
    {
        string tenantId = segments[0];
        var tenant = tenantService.GetTenantById(tenantId);
        if (tenant == null)
        {
            context.Response.StatusCode = 400;
            await context.Response.WriteAsync("Unknown tenant");
            return;
        }
        context.Items["Tenant"] = tenant;
        // strip the tenant segment from the path for downstream routing
        context.Request.Path = "/" + string.Join('/', segments.Skip(1));
    }
    await next();
});
This example finds the first URL segment, looks up the tenant, and then rewrites the request path to remove that segment so that the controllers see the URL without the tenant prefix (ensuring normal routing works). Alternatively, you could incorporate the tenant segment into all your route definitions (but that gets repetitive unless you use a route convention). There are also frameworks (like Orchard Core, or Finbuckle with WithBasePathStrategy) that support this pattern.
Pros: Does not require special DNS or multiple host bindings – all tenants come through the same domain. It’s very easy to test (you can just hit localhost:5000/tenant1, /tenant2 etc. without DNS setup). It keeps the URL intuitive and RESTful for scenarios where tenant context is part of the resource path. If a user switches tenant context, it’s just a matter of changing the URL path; theoretically, the same session cookie could even be used if the application allows (though typically you’d separate sessions per tenant anyway).
Cons: One big consideration is security – if using path, ensure that you always validate the user actually belongs to the tenant they are trying to access. An authenticated user could manually craft a URL to another tenant’s path; the app must prevent data leakage by not simply trusting the path. Usually, you’d combine this with authentication such that upon login the user’s tenant is known and you wouldn’t allow them to switch via path arbitrarily. Another con: relative URLs in web apps need care (when the app is hosted at a path, you have to ensure links, forms, etc., preserve the tenant prefix – using ~/ (tilde) in Razor can help by generating path-adjusted URLs). Also, if you have many controllers or endpoints, you either have to add {tenant} to each route template or handle it in a centralized way as above. If you forget to secure one endpoint properly, you might accidentally serve cross-tenant data.
Tenant via Query Parameter or Header
Some applications pass the tenant identifier as a query string parameter (e.g. https://example.com/app/resource?tenant=tenant1) or in a custom HTTP header (e.g. X-Tenant-ID: tenant1). This is less visible to the user (especially headers), but it can be suitable for internal APIs or multi-tenant services behind a gateway.
Implementation: For query strings, you can read Request.Query["tenant"] in middleware. For headers, check Request.Headers["X-Tenant-ID"] or whichever header name you choose. The resolution logic is similar: lookup the tenant from that value and store context. This strategy might be used when a front-end (like a single-page app) knows the tenant context and appends it to requests, or when using a gateway (like Azure API Management or an API gateway) that injects the tenant ID header based on the request’s domain or context.
Pros: Does not require DNS or path manipulation. A header approach can completely separate routing from tenancy – the URLs remain the same for everyone, and tenancy is determined out-of-band. This can be useful in microservice scenarios where, say, a gateway authenticates the user and determines their tenant, then forwards the request with a header so downstream services don’t have to re-compute it. It’s also easy to test by just adding the query or header. Another advantage is that it can be changed without changing the URL, which sometimes is useful if, for example, a background service is making cross-tenant calls on behalf of an admin.
Cons: For web browser scenarios, query strings can be messy (and potentially bookmarkable, which might expose tenant IDs unintentionally). Headers cannot be set by a browser on a cross-domain request unless allowed, so it’s mostly a backend-to-backend strategy or requires custom client code to add the header. Security is again critical – you should not allow an end user to simply change the tenant query param or header to another value and access someone else’s data. This approach typically requires that you combine it with authentication: the system should validate that the authenticated user is allowed to act on the tenant ID provided. If using a header in a public API, it could be spoofed unless you have an upstream component verifying it. Therefore, header-based tenancy is often seen in protected internal calls or after an authentication proxy.
Tenant Inferred from User Identity (Claims-Based)
In many scenarios, once a user logs in, their tenant affiliation is known and fixed. For example, if users can only ever belong to a single tenant (common in B2B SaaS), the act of authentication inherently identifies the tenant. The application can then rely on the authenticated principal’s claims or roles to determine tenant context, rather than an URL or header.
Implementation: With ASP.NET Core Identity or any identity system, you can include a tenant identifier as a claim in the user’s JWT or cookie. For instance, when issuing a JWT, include a claim like tenant_id = 123 or use a standard claim like http://schemas.microsoft.com/identity/claims/tenantid (used in Azure AD scenarios) code-maze.com. In ASP.NET Core, after the user is authenticated, you can retrieve this via User.FindFirst("tenant_id"). You might then use middleware to populate a TenantContext from this claim. If you’re using policy-based authorization, you can even automatically enforce that the user’s tenant claim matches something, though typically you’ll just use it to filter data.
With this approach, you often don’t need the tenant in the URL at all – the app can implicitly know the tenant from the user’s session. However, you might still combine it with path or subdomains for multi-tenant routing of unauthenticated pages or if users can switch context.
Pros: This is very secure and straightforward once set up – you avoid the possibility of a user manipulating a URL to access another tenant, because the server solely trusts the token/claim issued by the authentication system. It also makes the URLs cleaner (tenant doesn’t need to appear). It’s especially suitable for single-tenant login scenarios, where, for example, a user goes to a tenant-specific login page or is otherwise restricted to their tenant. After login, every request is automatically scoped. It reduces the chance of developer error in forgetting to add a tenant filter in an endpoint, because you can encapsulate the tenant context resolution entirely in auth middleware.
Cons: It’s inflexible if users or integrations span multiple tenants. For instance, an admin who can switch between tenants would need a way to change their context, which might require re-authenticating or obtaining a token for each tenant. If users can belong to multiple tenants (e.g., a consultant with access to two companies’ data), the claim will only carry one at a time – you’d need a mechanism to select which tenant context the user is operating in now (often done via an impersonation or “switch tenant” after login, which updates some session context). Another con is that this requires the authentication system to be aware of tenants and include that info in the token – which is usually fine if you control the identity system (like ASP.NET Core Identity or your custom IdP), but if you rely on an external identity provider, you might need to map external tenant info to your internal tenants.
Example: The Code Maze multitenant example application uses claims-based tenant resolution. They issue a JWT where a custom claim contains the tenant name (BranchA, BranchB, etc.), and after authentication, they pull this claim and use it to set the current tenant context code-maze.com. They then apply an EF Core global query filter to restrict data by that tenant claim, ensuring every query only returns rows for that tenant code-maze.com. This approach works nicely for the typical scenario where each user account is tied to exactly one tenant.
Combining Strategies
It’s worth noting that these strategies can be combined. For example, many SaaS apps use subdomains to distinguish tenants and include the tenant ID in the user’s claims after login for double assurance. Or a system might accept a header for internal API calls but also support subdomains for external calls. When designing your ASP.NET Core application, choose a primary strategy that fits your use case and consider fallbacks or mixed approaches as needed.
ASP.NET Core Implementation Tips: No matter which method you choose, a good pattern is to create a middleware early in the pipeline that resolves the tenant and stores a TenantContext in the request scope (e.g., HttpContext.Items or a scoped DI service). Then downstream you can access it in controllers, services, and especially in your data access layer. The tenant resolution should be fast (usually just parsing a string and dictionary lookup), so it’s fine to do on each request. You can also use the IHttpContextAccessor to retrieve information if needed outside the normal request flow (though avoid using that in libraries if possible; better to flow the context via DI).
Frameworks like Finbuckle.MultiTenant can greatly simplify the setup. Finbuckle allows you to configure multiple resolution strategies (e.g., try subdomain first, then header, etc.), and it provides an ITenantInfo that becomes available for injection. It also supports things like per-tenant app settings and even multi-tenant EF Core support. If building from scratch, ensure thorough testing of your resolution logic – try accessing resources with and without specifying tenant and make sure it behaves as expected (no data if tenant not resolved, correct tenant data when resolved, etc.).
Now that we have a tenant context for each request, the next step is making sure our data and logic honor that context – particularly, isolating each tenant’s data. We’ll look at how to handle identity (authentication/authorization) and data access with tenants in mind.
Identity and Authentication for Multi-Tenant Applications
Authentication and user management in a multi-tenant application can get complicated, because you need to isolate users by tenant while possibly allowing different authentication methods per tenant. We’ll cover two aspects: (1) using ASP.NET Core Identity or custom identity stores with tenant isolation, and (2) integrating external Identity Providers (IdPs) for tenant-specific authentication, such as allowing each tenant to use their corporate Azure AD or other SSO.
Multi-Tenant User Management with ASP.NET Core Identity
ASP.NET Core Identity (the membership system with IdentityUser, etc.) is often used to handle user registration, login, and related security features. Out of the box, it’s not multi-tenant aware – it assumes one user store for the application. To make it multi-tenant, you typically need to introduce a Tenant ID field in relevant tables (Users, Roles, etc.) and filter by it whenever accessing users.
Approach 1: Single Identity DB, with TenantId field – You can extend the IdentityUser class to include a TenantId property, or even use the IdentityUser<TKey>’s unused fields to store a tenant reference. Then you would modify how users are created and queried. For example, when creating a new user, set their TenantId to the current tenant. When signing in, ensure you look up by username and tenant. This likely means overriding the user store or certain manager methods to include a filter on TenantId. Additionally, you should enforce uniqueness of usernames per tenant (not globally, unless you want that). This can be done by adding a composite index on (NormalizedUserName, TenantId) in the AspNetUsers table scottbrady.io, so that two tenants can have a “jsmith” user without conflict, but within one tenant, usernames are unique. The code sample from Scott Brady’s blog shows how they added an index to include TenantId as part of the uniqueness constraint scottbrady.io.
You also need to override the validation logic that checks for duplicate emails/usernames because the default assumes global uniqueness. In the same blog, an override of ValidateEntity is used to ensure that duplicate usernames/emails are checked per TenantId scottbrady.io. All this amounts to a fair bit of work: “It’s a fair amount of work to multitenant ASP.NET Identity, involving hardcoded overrides and database schema modifications.” scottbrady.io. This quote underscores that using ASP.NET Identity in a truly multi-tenant fashion isn’t trivial – you have to replace some internal logic.
Once set up, however, your application can simply scope user operations to the current tenant. For instance, if you call UserManager.FindByNameAsync("jsmith"), you must ensure it does so for the current tenant only (perhaps by a custom UserStore that filters by a TenantId from context). Another simpler (but less strict) approach is just to include the tenant in the username or email (like store “jsmith@tenantA” as the username internally). This way uniqueness is inherently scoped, though that can be clunky and not user-friendly for login.
Approach 2: Separate Identity Stores per Tenant – This would mean each tenant has its own set of identity tables, either in the same database (but different schema or table name prefix) or completely separate database. This is effectively treating each tenant like a separate application as far as identity is concerned. While highly isolated, it’s usually not recommended unless tenants are totally separate and maybe even hosted separately. It becomes unwieldy to manage multiple identity databases – provisioning a new set of identity tables for each new tenant and possibly migrating them all on changes. Most SaaS opts for a shared identity store with tenant discriminators (Approach 1) or external IdPs (discussed soon).
Approach 3: Hybrid – Central Identity with Tenant Filter – A variant of Approach 1 is to use a single Identity database but not actually modify the schema, instead manage tenant filtering in code. For example, you could store tenant as a claim and simply ensure that any user lookup is done in the context of that tenant. Perhaps you use the email domain to infer tenant, etc. However, without a TenantId column, enforcement gets tricky. It’s more robust to alter the schema or at least enforce at login that user’s email domain or similar matches the tenant.
Role and Permission Management: If each tenant can have their own roles or permissions, you should include tenant context in those as well. This could mean having a TenantId in the AspNetRoles table if tenants can define custom roles. Or you treat roles as global but assign users to roles per tenant (likely with a linking table that includes TenantId). ASP.NET Identity doesn’t support multi-tenant roles out of the box, so you might handle it by prefixing role names with tenant or using a custom role store.
User Belonging to Multiple Tenants: Out of the box, Identity can’t have one user in two tenants if TenantId is a single value on the user. If you need that (say an MSP manages multiple clients, or a user switches companies), you’ll have to either duplicate the user accounts (one per tenant) or implement a linking logic outside of Identity. A simplified route is to duplicate accounts per tenant – which is what many SaaS do, treating the same person in two orgs as two user entries (maybe with same email but different TenantId, which requires removing unique email constraint globally). This is a product decision; if cross-tenant users are rare or not allowed, you enforce one tenant per user.
Login Flow Consideration: If using the built-in Identity UI, you may need to extend the login screen to capture the tenant (like a dropdown or subdomain mechanism). For example, if you go to tenant1.example.com/login, you can have code that knows to set the TenantId when validating the user’s credentials. If using a single domain, you might require the user to input an “Organization ID” along with username/password. Alternatively, you could do email-based tenant routing: e.g., user enters email, and the system determines tenant from the domain part and then validates password against that tenant’s user. Any of these approaches need to be carefully implemented to avoid leaking info (like don’t reveal if an email exists in another tenant).
ASP.NET Core Identity with Multitenancy Libraries: The Finbuckle library provides some guidance and extensions for multi-tenant Identity. For example, Finbuckle’s samples show how to isolate Identity data by tenant and even provide a separate registration page per tenant. Essentially, Finbuckle can swap out the DB connection or use a global query filter on Identity tables similar to how we do for our application data. Speaking of which:
Data Filtering and EF Core: As part of multi-tenant identity, if you integrate it with your application data, you’ll also want to ensure that when you query data, you filter by tenant. This can be done using EF Core Global Query Filters. For example, if you have a Goods entity with a TenantId property, you can apply a filter in OnModelCreating like:
csharpCopymodelBuilder.Entity<Goods>()
    .HasQueryFilter(g => g.TenantId == _tenantContext.TenantId);
Where _tenantContext.TenantId is something you set per scope (perhaps via constructor injection into the DbContext). Code Maze’s example does exactly this, storing a tenant object in the DbContext (via injection) and then using it in HasQueryFilter code-maze.com. This ensures that any query on Goods will automatically include a WHERE TenantId = X clause. They also override SaveChanges to stamp the TenantId on new entries code-maze.com, so you can’t accidentally save data without a TenantId. This pattern is highly recommended for multi-tenant data safety. It acts as a safety net so that even if a developer forgets to add a .Where(t => t.TenantId == currentTenant) on a LINQ query, EF will inject it.
However, be cautious: EF Core’s global filters have one caveat – if not implemented carefully, the tenant id value might be captured at model build time. The approach shown (capturing a context field _tenantContext.TenantId) works if _tenantContext is a property on the context that is set per instance. If you instead used a static or a closure, it could stick to one value. The official docs show using EF.Property<object>(e, "TenantId") == currentTenantId to avoid closure issueslearn.microsoft.com. In practice, injecting a scoped tenant provider and reading from it in the filter works as long as the context is scoped per request.
Summary: It’s absolutely possible to use ASP.NET Core Identity in a multi-tenant app, but it requires designing the user store to be tenant-aware. You either modify the existing system to include tenant info or maintain separate stores. For most, adding a TenantId to the user and role tables and filtering by it is the way to go. Once that’s in place, you can integrate with ASP.NET Core’s authentication to include the tenant claim after login (as discussed) and then use policies to ensure a user can only access their tenant’s data. For example, you might create an authorization policy that checks that a route parameter {tenant} matches the User.Identity.TenantId claim, to double-protect any multi-tenant API endpoints.
External Identity Providers per Tenant (Tenant-Specific Auth)
Many enterprise-focused SaaS applications allow customers to use Single Sign-On (SSO) with their own Identity Provider – for example, allowing a tenant’s employees to log in with their company’s Azure Active Directory (now Entra ID) or Okta, instead of creating separate credentials. This introduces multi-tenancy at the authentication layer: your app must accommodate multiple external IdPs, potentially one per tenant or a few shared among tenants.
Common Scenarios:
- Azure AD / Entra ID B2B: You register your application as multi-tenant in Azure AD. This means any Azure AD tenant (customer’s directory) can integrate by granting your app access. In this model, a user authenticates on Azure and Azure provides a token with a
tid(tenant ID) claim representing the user’s directory. Your app then maps that to your SaaS tenant. Often, you’ll store in your tenant registry the Azure AD tenant ID or domain that corresponds to your customer. So if a user from Azure AD tenant GUID X logs in, you know that maps to, say, Tenant ABC in your database. Microsoft Entra ID (formerly Azure AD) is built to allow such multi-org apps (like many Microsoft 365 apps). You have to handle the initial onboarding (someone from that tenant consenting to your app). Once that’s done, any user from that tenant can SSO. - Custom SAML/OIDC per Tenant: Some SaaS allow each tenant to configure their own SAML 2.0 identity provider or OIDC provider. For instance, Tenant A might use Okta, Tenant B uses ADFS, Tenant C uses Google, etc. Your application needs to act as a service provider that can redirect to the right IdP based on which tenant is trying to log in. If using subdomains, it’s easy:
tenantA.example.comtriggers SSO with Okta (using settings stored for Tenant A),tenantB.example.comuses a different endpoint. If using a unified domain, you might have the user select their organization or email first to know which IdP to use. - Social Logins by Tenant: Perhaps each tenant can allow login via certain social accounts (common in B2C scenarios). This is similar, just multiple possible IdPs.
Implementation Approaches:
- Single Multi-Tenant IdP: If you use Azure AD multi-tenant mode or a centralized IdP that supports multi-tenancy, you might not need separate configurations per tenant. Azure AD’s multi-tenant app will accept users from any Azure AD tenant by default (unless locked down). You still need to map the incoming user to the correct tenant in your app, which usually involves reading the
oid(user object id) andtid(directory id) claims. Thetidis essentially the external tenant identifier. You’d have pre-associated that external tenant ID with your internal tenant. This scenario is straightforward with ASP.NET Core’s OpenID Connect middleware: you configure a single scheme that allows multi-tenant, and it will handle any org’s login. However, not all IdPs have this concept. - Multiple Authentication Schemes: ASP.NET Core allows multiple authentication schemes. You could configure one OIDC scheme per tenant or per IdP. For example, an Okta scheme for Tenant A, AzureAD scheme for Tenant B, etc. However, if you have many tenants, you don’t want to statically register dozens of schemes in startup. Instead, you might dynamically build the options or use a single generic OIDC handler but change its settings on the fly based on the tenant. There isn’t built-in support for multi-configuration in one auth handler instance, but you can work around by writing a custom OpenIdConnectEvents.OnRedirectToIdentityProvider that sets the authority based on the tenant context.
- Federation Gateway: Another approach is to use an external service or a custom identity server as a gateway. For example, you deploy IdentityServer (now Duende IdentityServer, since IdentityServer4’s license changed) or Auth0 or Azure AD B2C as a federated identity hub. In that model, your application trusts one JWT issuer (the gateway), and that gateway in turn federates with the various external IdPs. Azure AD B2C, for instance, can be set up with multiple SAML/OIDC identity providers (like Google, Facebook, any OpenID Connect). But historically, B2C is more for B2C scenarios; for B2B (organization as tenant), Azure AD direct multi-tenant or Entra ID B2B is more common. Using a federation gateway simplifies your app (you handle one set of tokens) but offloads the multi-IdP complexity to an identity service.
If implementing yourself, after external login, you’ll typically get some unique user ID from the IdP (like a sub claim, or in Azure AD, the user’s object id and the tenant id). You then need to provision or link that external identity to an internal user record and tenant. This often means on first login from a new IdP, you create a user in your database (or not, if you go user-less and rely entirely on tokens – but usually you want an internal user object to attach app-specific roles/settings). You might key the internal user by something like [TenantId, ExternalId].
Security and Protocols: Make sure you clarify what protocols to support (OIDC, SAML2, WS-Fed, etc.) learn.microsoft.com. ASP.NET Core has good support for OpenID Connect out of the box. For SAML2, you’d use a third-party component (or something like ITfoxtec Identity Saml library) because there’s no built-in SAML middleware. Supporting multiple protocols can be heavy, so some SaaS limit what they allow (maybe OIDC only, or OIDC + SAML as needed). Also, note that some IdPs have limits – e.g., an Okta developer account might limit number of apps or such. Azure AD can federate with others through B2B, but if you tried to have Azure AD app for each customer you might end up managing many registrations.
Tenant-Specific Customizations: With external IdPs, often each tenant might have their own branding or login page. If using subdomains, you can redirect to the IdP with a parameter or different clientID to show the right branding (some IdPs support a branding context or domain hint).
Entra ID (Azure AD) Multi-Tenancy vs App Tenancy: A quick note: Microsoft’s terminology can confuse. Microsoft Entra ID (Azure AD) uses the term “tenant” to mean an Azure AD instance/directory. That’s not the same as your SaaS tenant concept, but in a multi-tenant app using Azure AD, there’s a relationship: each of your SaaS tenants might correspond to one Azure AD tenant (customer’s directory) learn.microsoft.com. Documentation will call those “Microsoft Entra tenants” to distinguish. In our context, when we say tenant we mean the SaaS tenant (customer). Just be clear when mapping those – for example, “Tenant X of our app is associated with Microsoft Entra tenant Y (their directory ID)”.
Implementation Example: Suppose our SaaS uses Azure AD for SSO and also allows username/password via Identity for those who don’t use SSO. We could enable Azure AD multi-tenant in our app registration. In ASP.NET Core, we use AddOpenIdConnect with Authority = https://login.microsoftonline.com/common (common endpoint allows any tenant) and ClientId of our app. A user from any Azure AD can log in. In the token we get, there’s tid. We then have a post-login event where we lookup which of our tenants has TenantId = tid (we must have stored that when configuring the customer). If found, we allow login and perhaps create a local user record if not exists. If not found, we could reject or treat them as a self-service sign-up, depending on business rules. This is an example of federation without manual per-tenant config. On the other hand, if Tenant A wanted to use Okta, we might separately configure an OIDC scheme for them.
Offering SSO as a Premium Feature: Not all tenants may need external SSO. Often, integrating with external IdPs is complex, so you might only offer it for higher-tier customers (and justify it with pricing). It’s common to have SSO/SAML integration be an enterprise plan feature. Microsoft’s guidance even notes you can consider providing federation as a feature only for higher product tiers learn.microsoft.com, because it adds complexity and sometimes you need to do custom setups per tenant.
Authorization Considerations: Regardless of authentication method, authorization should be tenant-scoped. If using claims, ensure the token can’t have two tenants. If using external, you might need to translate external roles to internal roles per tenant. For instance, a user might be an “Admin” in their Azure AD, but you might not automatically want that to mean admin in your app; you’d maintain separate roles.
Admin Users and Tenant Admin: Usually, each tenant will have some users with elevated privileges within that tenant (e.g. a tenant administrator who can manage users of their org, configure settings, etc.). Your identity design should accommodate roles or claims that are scoped per tenant. If you implemented TenantId in Identity tables, you might also have roles like “Admin” that are defined per tenant (maybe the role name plus TenantId key). Alternatively, you implement the concept of tenant admin in your own data structures and check it through your authorization policies.
Global Admin (SaaS owner): If you as the SaaS provider have an admin panel to manage all tenants, that’s another layer – you’ll have an identity that is allowed to bypass tenant scoping (like a super admin). You should design to keep that separate (maybe a separate app area, or a special claim that allows it). But be very careful that those privileges are only granted to your staff accounts and that you audit their use (you might expose audit logs to customers if that’s part of trust-building).
In summary, multi-tenant authentication can range from simply partitioning users by a tenant field, to complex federation scenarios. Start with the simplest approach that meets requirements. For many, that’s a single tenant field in the user database and issuing a claim for it at login. As your app grows to enterprise clients, you can add SSO integration. Just plan the architecture so that it’s possible – e.g., have a notion of tenant identity config in your system from the beginning (even if initially just “local auth”).
Microsoft’s Identity guidance for multitenant solutions recommends clarifying what identity scenarios you need (social logins, tenant-specific directories, etc.) and what protocols to support learn.microsoft.com. Also, be mindful of scale – an identity system might have limits on number of external IdP federations learn.microsoft.com. For instance, if you tried to federate with hundreds of SAML IdPs, that could be cumbersome. Often, using a centralized broker like Entra B2C or Auth0 can offload that.
Finally, when using any external IdP, enforce tenant-specific redirects and validation. E.g., if using subdomains, ensure tenanta.example.com only allows logging into Tenant A – you wouldn’t want someone to manipulate an OIDC redirect to log into another tenant’s context.
Per-Tenant Configuration and Feature Flags
Beyond core data and identity, multi-tenant applications often require per-tenant configuration settings and the ability to turn features on/off per tenant (feature flags). This allows a single codebase to behave differently for different tenants – for example, enabling a beta feature for only one customer, or having custom settings like branding, quotas, or integrations for each tenant.
Per-Tenant Configuration Settings
Configuration that varies by tenant could include things like: branding elements (logo, theme color), business rules (e.g., tenant A’s max users = 100, tenant B’s = 1000), integration endpoints (one tenant might integrate with their own API, needing credentials stored), or toggles for modules (one tenant paid for module X, another did not). Storing and managing these settings calls for a strategy.
Approach 1: Central Config Store with Tenant Keys – A straightforward approach is to use a key-value configuration store and partition by a tenant identifier. For example, Azure App Configuration is a managed service that works great for this. You can have configuration keys like "TenantA:SettingX" and "TenantB:SettingX" with respective values. Azure AppConfig supports labels which can act as a partition or version discriminator. One could use the tenant ID as a label or prefix on keys learn.microsoft.com. When your application starts or when serving a request, it would load the config for the relevant tenant by filtering keys or using a label selector.
Azure’s guidance summarizes two models for config stores similar to what we discussed for databases: shared store vs store-per-tenant learn.microsoft.com. In a shared configuration store, you keep all tenants’ settings in one store (distinguished by keys/labels), which is low-cost and simpler to manage but provides less isolation learn.microsoft.com. Alternatively, you could deploy a separate configuration store per tenant for complete isolation (and perhaps give tenants direct access to their config store if you allow self-service config), but that’s usually only done in extreme cases due to higher operational overhead learn.microsoft.com. The shared store approach is common, using key prefixes like tenantId:SettingName learn.microsoft.com.
For example, you might have a configuration key for “MaxUsers” and set TenantA:MaxUsers = 50, TenantB:MaxUsers = 200. At runtime, after resolving tenant, you combine tenant + key to get the setting. Azure App Configuration’s .NET provider allows you to load configuration with a Key Filter or Label Filter learn.microsoft.com. You could do something like:
csharpCopyvar tenantId = currentTenant; // e.g. "TenantA"
configBuilder.AddAzureAppConfiguration(options =>
{
    options.Connect(appConfigConnectionString)
           .Select($"{tenantId}:*", LabelFilter.Null); // load all keys prefixed with "TenantA:"
});
And maybe also load common (non-tenant-specific) config normally. Another approach is to load all tenants’ config at startup and keep in memory, but that only works if tenant count is small or if you periodically refresh or on demand. Usually, you fetch what you need per tenant.
Approach 2: Tenant Config in Database – Some apps store tenant-specific settings in their main database, e.g., a table TenantSettings with TenantId, Key, Value. This works and keeps config versioned with data. It’s easy to update in a transaction with other data changes. But retrieving these settings on every request can be slow if not cached. Typically, you’d load them once when the tenant session starts (e.g., at login or first request, or cached in memory or distributed cache) and reuse. One could also use ORMs to map a TenantSettings entity, but a simple dictionary loaded from DB might suffice.
Approach 3: Separate Config Files per Tenant – If tenants are relatively few and perhaps have heavy differences, one could maintain separate config files like appsettings.TenantA.json. You could then deploy those or store them. However, this doesn’t scale well beyond a handful of tenants, and any change requires file updates (possibly triggering restarts). It’s rarely used except maybe in on-premises single-tenant deployments.
Azure App Configuration deserves a special mention because it also supports dynamic refresh and integration with Azure Managed Identity, etc. You could have the app subscribe to changes so that if you update a tenant’s config in the store, it can pull the new settings without redeploy. Azure’s architecture guide suggests using key prefixes or labels to separate tenant settings in a shared store learn.microsoft.com. They also compare isolation models for config stores: a shared store has low isolation (tenants’ config side by side) but lower cost, while store-per-tenant gives high isolation at higher cost learn.microsoft.com.
From the table in the doc learn.microsoft.com, we see considerations like data isolation, performance isolation, complexity, cost, etc., which mirror our earlier discussions. For config, usually a single store can handle thousands of keys so it’s fine for many tenants – just be mindful of service limits (like max requests per hour, total key count) learn.microsoft.com. If one tenant’s config is huge or you have extremely many tenants, you might consider multiple stores sharded (e.g., by region or by tenant categories) learn.microsoft.com.
In our context, using Azure AppConfig in .NET Core is straightforward with the Microsoft.Extensions.Configuration.AzureAppConfiguration package. It even has a feature management extension which we’ll discuss next.
Feature Flags and Per-Tenant Feature Management
Feature flags allow you to turn features on or off without deploying code changes, and importantly here, to target those flags to specific tenants or user segments. For multi-tenant SaaS, this is invaluable: you can do staged rollouts by enabling a feature for a pilot tenant first, or maintain different plan tiers by gating premium features behind a flag that’s true only for tenants on that plan.
LaunchDarkly is one popular SaaS solution for feature flag management. Using LaunchDarkly, you can define feature flags in their dashboard and then, in your code, wrap new features with flag checks. LaunchDarkly’s SDK will fetch the flag values (with caching) and evaluate them for the current context (which can include tenant and user). For example, you might define a flag NewDashboardEnabled and set its targeting rules such that tenant == "TenantBeta" gets it enabled, others false. In code:
csharpCopyif (ldClient.BoolVariation("NewDashboardEnabled", userContext, false))
{
    // show new dashboard
}
else
{
    // show old dashboard
}
Here userContext would be a LaunchDarkly user or context object that includes a key for the tenant. LaunchDarkly recently introduced the concept of multi-context (so you can have a context kind “tenant” with an ID). So you could evaluate flags by providing both user and tenant context, and the flag rules could target at the tenant level.
The benefit is you can change those flags instantly from the LaunchDarkly UI and the application will toggle the behavior in real-time (the SDK maintains a live connection for updates). LaunchDarkly also supports experiments and gradually rolling out to a percentage of users, etc., though for tenant-level you’d likely do all-or-nothing per tenant.
As the LaunchDarkly team notes, feature flags can be used to manage entitlements (which features each customer can access) without coupling it to the core account management logic launchdarkly.com. You don’t have to deploy new code or create special case code paths for each tenant; instead, you write the code for the feature generally, guarded by a flag, and use targeting rules in LaunchDarkly to control which tenants see it. This provides flexibility to enable a feature for, say, internal testing or for one customer who requested a beta.
Important best practice: Treat the feature flag configuration as code (in the sense of controlling behavior). Manage it carefully, possibly with naming conventions like “PlanGold.FeatureX” flags for plan entitlements. And clean up flags once a feature is permanently enabled for everyone to avoid accumulating tech debt.
Azure Feature Manager (App Configuration Feature Flags): Azure App Configuration includes a feature management library for .NET. It allows defining feature flags in the AppConfig store and using an IFeatureManager in code to check if a feature is on. It also has concept of filters to do conditional activation. For example, a filter might say “enable this feature if user in group Y” or at certain time. As of .NET 7/8, Azure’s feature management supports targeting filters, though not as sophisticated as LaunchDarkly’s segmentation. You might implement a custom filter that reads the current tenant from context and compares against a list in config. But that can become static. If you need dynamic per-tenant toggling, LaunchDarkly or other dedicated systems (ConfigCat, Unleash, etc.) might be more convenient.
Implementing Simple Tenant Flags without External Service: If you prefer not to use an external system, you could store flags in your DB or config per tenant (like a JSON of features enabled). For instance, in TenantSettings table you might have columns like IsFeatureXEnabled. This works but requires a deployment or database update to change, which might not be as quick as a LaunchDarkly toggle. Alternatively, combine with config service – e.g., in AppConfig have a key TenantA:Features:FeatureX = true/false. Then your code can read that config for the tenant to decide. Azure AppConfig feature flags could also be labeled by tenant.
Example Use Cases for Feature Flags in SaaS: Rolling out a new UI module gradually to tenants; enabling a one-off custom feature only for a specific client (maybe as a paid customization) without maintaining a separate code branch; turning off a feature quickly if it’s causing issues (perhaps just for one tenant who doesn’t use it heavily); A/B testing a feature on a subset of tenants or users; implementing tiered plans (e.g., “Gold Plan” has advanced analytics = flag on for Gold tenants, off for others). Indeed, feature flags and entitlements blur together. LaunchDarkly even publishes guides on using flags for entitlement management launchdarkly.com, highlighting benefits like not needing to alter account records for every little feature – instead, a central service controls it launchdarkly.com.
Caching and Performance: Load configuration and flags in a way that doesn’t add excessive overhead per request. For instance, if you use LaunchDarkly, the SDK caches and is very fast at eval (just in-memory check). If you use AppConfig directly, consider enabling caching or loading values into memory for the tenant context. Hitting an external config service on every request could be slow; typically you’d load tenant config at session start or first request and cache in a memory dictionary keyed by tenant for quick lookups. Azure AppConfig has a .Watch or refresh mechanism to update the cached config periodically or when a sentinel key changes.
Security of Config: If tenant admins are allowed to configure some settings themselves (for example, upload their logo or set a setting in an admin UI), you need to write back to config store or DB and then propagate that. Many SaaS simply store that in their own database. If you were to allow something like that via Azure AppConfig, you’d have to give a connection per tenant which is messy. Usually, use AppConfig for things only your system administrators control, not tenant end-users.
Example Code for Tenant-specific Config Usage: Suppose we want to display a tenant’s theme color in the UI. We might have a service:
csharpCopystring themeColor = config[$"{tenantId}:ThemeColor"] ?? config["DefaultThemeColor"];
ApplyTheme(themeColor);
If using Azure AppConfig loaded into IConfiguration, this is straightforward as shown. If using a strongly-typed options pattern, one could bind a configuration section for the tenant. But since each tenant is dynamic, often a manual lookup is fine.
Summary: Use configuration management techniques to avoid hardcoding tenant differences. Azure App Configuration is a strong solution for centralizing settings, and it explicitly supports multitenancy through keys/labels learn.microsoft.com. LaunchDarkly (or similar services like ConfigCat, Unleash, Split) provide robust feature flag capabilities that can target at tenant level. These tools keep your codebase unified while delivering different experiences to tenants – a hallmark of scalable SaaS. They also reduce the temptation to fork code for a special customer, because you can handle variation via configuration and flags (which is far easier to maintain than custom branches for each client).
CI/CD Strategies for Multi-Tenant SaaS
Continuous Integration and Continuous Deployment (CI/CD) for a multi-tenant application brings its own set of challenges. In a traditional single-tenant app, you deploy one instance and you’re done. In a multi-tenant app, you may have one deployment serving all customers or many deployments (in the single-tenant model or hybrid cases). You also need to handle database migrations for multiple tenant databases or schemas, possibly coordinate feature rollouts across tenants, and sometimes deliver hotfixes to specific subsets of customers without impacting others. Let’s break down strategies and best practices for CI/CD in this context:
Unified vs. Tenant-Specific Deployments
One major consideration is whether you maintain one unified deployment for all tenants or multiple deployments (instances) for different tenants. This was touched on in tenancy models (shared vs isolated). From a CI/CD perspective:
- Unified Deployment (All Tenants on Same Release): This is the simpler case for CI/CD. You have a single pipeline that builds and tests the application, and when you deploy, it updates the shared production environment that serves all tenants. The key here is to ensure backwards compatibility where needed – since you can’t update one tenant at a time, the update must work for everyone simultaneously. This often means if you have per-tenant feature toggles, you deploy the code (which contains all features) and then use config/flags to control visibility. Unified deployments are consistent with trunk-based development and frequent releases. Every tenant always runs the latest code (perhaps with some features off). This model reduces operational complexity – you don’t have to track which tenant is on which version, because there is only one version in production. However, it raises the stakes of each release (a bad release could affect all customers). Thus, investing in automated testing, canary releases, and robust monitoring is critical.
- Multiple Deployments (Tenant-specific or Stamp-specific): Here, you might have separate deployment units. For example, each tenant has their own App Service or their own Kubernetes namespace. Or you have groups of tenants on different stamps. CI/CD in this scenario might involve deploying to each environment either in parallel or sequentially. You might script your pipeline to loop through all active tenants or stamps and deploy the new version to each. Alternatively, you could have separate pipelines per tenant environment – but that doesn’t scale and is hard to manage (imagine updating 50 nearly identical pipelines). A better approach is parameterizing your deployment – one pipeline template that can deploy to a given tenant’s resources, and then either triggered automatically for all tenants or manually for certain tenants. If tenants are on different versions (perhaps some have opted to not upgrade yet), then your CI process starts to resemble that of product version support: you might have to maintain multiple branches or releases. For instance, you have v1.0 still running for Tenant X, while v1.1 is out for others. You’d then need the ability to patch v1.0 (a hotfix) while continuing forward development on main for v1.2, etc. This quickly grows complex and is generally something to avoid unless absolutely required.
As a guiding principle, keeping all tenants on a common codebase and version is highly recommended dotnetwisdom.co.uk. It simplifies testing and support. Tenant-specific deployments should ideally be homogeneous – meaning you deploy the same version to all, just possibly on separate infrastructure. One source says: trying to maintain variant code for each tenant becomes “a huge mess” and it’s far better to have a single configurable codebase dotnetwisdom.co.uk. If a particular tenant truly needs a one-off change, consider if it can be done via configuration or feature flag instead of a code fork.
In scenarios where some big tenants have isolated deployments, you might still decide to deploy them on the same schedule as the shared environment, just with an extra step. For example, deploy to multi-tenant environment (tenants A, B, C) and also deploy the same build to Tenant D’s dedicated environment. This ensures Tenant D doesn’t drift far behind.
Branching Strategies for Multi-Tenant Development
The choice of Git branching strategy can influence how you manage releases to multiple tenants. Common models include GitFlow, trunk-based, and release branching. Let’s consider them in context dotnetwisdom.co.uk:
- Trunk-Based Development: All developers work on a single main branch, with feature flags for incomplete features. Releases are cut frequently from trunk. This model works well when all tenants run the same version. If you practice continuous deployment, trunk always goes to production (after passing tests). With trunk-based, you avoid long-lived branches and reduce merge conflicts. In multi-tenant SaaS, trunk-based is a good fit if you keep a unified deployment dotnetwisdom.co.uk. You rely on feature toggles to handle differences, not branches dotnetwisdom.co.uk. This avoids the scenario of “branch per tenant” entirely. One can still have short-lived feature branches for code review, but they merge back quickly. If you need to support an older version for some tenants, trunk-based suggests maybe you don’t – instead, try to get everyone updated. If that’s not possible, then you introduce release branches as needed (see below). But as long as all tenants can move in lockstep, trunk-based + CI/CD yields rapid delivery.
- GitFlow: This approach uses a
developbranch,masterbranch, and separate branches for features, releases, and hotfixes. It’s more heavyweight and suited for scheduled release cycles. In a multi-tenant context, GitFlow could allow you to have multiple release lines (e.g., v1.x maintained on a release branch while v2.x is in development). If you had some tenants on v1 and some on v2, GitFlow’s release branches help manage that. However, maintaining separate versions per tenant is generally discouraged as it becomes unmanageable at scale dotnetwisdom.co.uk. GitFlow might be overkill if you deploy continuously; it could slow you down. Some sources note that using GitFlow for per-tenant variations isn’t recommended – it’s better to keep tenants on the same version and use config to vary behaviour dotnetwisdom.co.uk. If you find yourself considering separate branches for each tenant, that’s a red flag – you will end up with code divergence and have a nightmare merging hotfixes across them dotnetwisdom.co.uk. Instead, use branches to manage version streams, not tenants. - Release Branching: This is a simpler approach than full GitFlow, where you maintain a branch per major release version (like
release/2.0). New development is in main, but if a bug in 2.0 (which some customers use) occurs, you fix on release/2.0 and perhaps merge forward. This is common in products where not everyone upgrades at once. In SaaS, ideally, you don’t want many parallel versions; but you might have an LTS version for on-prem or a scenario where one tenant cannot upgrade immediately due to their own constraints. Release branches give you a way to support that without interfering with main development. If you do have, say, some tenants lagging behind, you might keep an older release branch alive for critical fixes dotnetwisdom.co.uk. For example, you’ve deployed 1.3 to most, but Tenant X is still on 1.2; you then keep arelease/1.2branch for any hotfixes until they upgrade dotnetwisdom.co.uk. Again, the aim is to minimize how long that situation exists, because maintaining many versions is costly. - Branch per Tenant: This is generally a bad idea. Some inexperienced teams think, “I’ll create a branch for custom changes for TenantA.” This leads to fragmentation where each branch deviates and you have to apply bug fixes to multiple branches. As an expert succinctly put it, maintaining variant codebases per tenant becomes “a huge mess” of diverging versions and duplicated fixes dotnetwisdom.co.uk. The overhead if dozens of tenants require different versions is enormous dotnetwisdom.co.uk. Instead, use a single branch and make the code flexible to tenant differences (through configuration, dependency injection, or modular design). Only consider per-tenant branches if essentially you have a completely separate deployment that truly warrants a fork (and if so, perhaps it should be a separate codebase or microservice, not just a branch).
Continuous Integration Considerations: Regardless of branching model, ensure your CI (build & test) covers multi-tenant scenarios. For example, run tests that simulate different tenant configurations (maybe via unit tests or integration tests that boot the app with different tenant settings). If you have feature flags, test both flag on and off states. Use automation to prevent a change for one tenant breaking functionality for others (this is akin to testing different configurations). If using trunk-based, your CI should be very robust as every commit could potentially deploy.
Deployment Frequency: Multi-tenant SaaS can actually deploy very frequently (some do daily or multiple times a day) because there’s no need to coordinate with customers (in contrast to packaged software). Feature flags help do safe deployments by hiding features until ready. Aim for small, incremental releases to reduce risk.
Handling Database Migrations in Multi-Tenant Environments
Database schema changes in a multi-tenant application must be handled carefully, especially if you have separate databases per tenant or a shared DB with large amounts of data.
Single Shared Database: If all tenants share one database, migrating is similar to any single app migration – you apply the schema changes to that one database. Tools like EF Core Migrations or Flyway can handle it in one go. Because the change affects all tenants’ data, you have to be extra careful about backward compatibility during rollout. Typically, with a shared DB, you do a zero-downtime deployment approach: e.g., additive changes first (add new columns, keep old columns for now), update code to use new columns, then later remove deprecated columns. This way, even if your app is updated all at once, you ensure no data loss or disruption. If you do need downtime for a major change, that downtime impacts all tenants at once, which is painful but at least it’s a single operation.
Database per Tenant: This is more involved, as you have N databases to migrate. Strategies:
- Migrate All in Batch: When a new release is deployed, part of the deployment process runs the migration against every tenant database. If you have tens of tenants, this could be quick; if you have thousands, doing them serially may be too slow for a single maintenance window. You might run migrations in parallel batches. With EF Core, for example, you could build a command-line tool or script that iterates through all known connection strings and runs
dbContext.Database.Migrate()for each. Ensure you have robust error handling – if one tenant DB fails to migrate (perhaps their connection is down), you may not want it to halt the whole deployment. One approach is to continue migrating others and mark the failed one for manual intervention. It’s important to have good monitoring around this. - Rolling Migrations: Some SaaS choose to roll out schema changes gradually. For instance, if tenants are grouped on different servers, you might take one server at a time, put those tenants in read-only mode briefly, apply migration, then move on. This is more relevant if you have a very large number of tenants or a very high uptime requirement where doing all at once is risky.
- On-the-fly Migration: Another pattern is to migrate each tenant’s DB when that tenant is first accessed after a deployment. In code, whenever a request comes in, you check a version stamp in the database (or a schema version table). If it’s behind the application’s expected version, you run migrations for that DB there and then. This way, you don’t have a long maintenance step up front – it spreads out the migration work as tenants come online. The downside: the first request for each tenant will be slow (or might time out if it’s a big migration), and handling errors in real-time can be tricky. Also, if a tenant rarely logs in, their DB might remain outdated until they do, which could be fine or not depending on if background processes expect the latest schema. Still, some teams use this approach to smooth out migration load.
Given that DB-per-tenant implies each DB likely smaller, each migration might be quick, but volume is an issue. Automation is key: use scripts or DevOps pipeline tasks to iterate through DBs. Also, consider concurrency – if you run migrations parallel, ensure your DB servers can handle it (e.g., if all tenant DBs are on one server, running 100 migrations concurrently might spike CPU/IO). Throttle as needed.
EF Core Migrations Tip: If using EF Core, generating a migration will assume one unified model. That works if all tenants have the same schema version at any given time. You might have to manage a situation where one tenant skipped a previous migration – ideally not, keep them in sync. If a tenant’s DB somehow missed a migration, your migration runner might need to apply multiple migrations. EF Core tracks applied migrations in a table per DB, so it should apply any pending ones sequentially.
Schema-per-Tenant: That’s even more interesting – one database but multiple schemas to migrate. EF Core isn’t built to manage multiple identical schemas easily. You might treat each schema as analogous to a separate database for migration purposes. One approach: for each schema, set the search_path (for Postgres) or use ALTER USER SET DEFAULT_SCHEMA (for SQL Server) and run migrations targeting that schema. Or generate a SQL script from the migrations and then run it once per schema (replacing schema name in the script). It’s a bit complicated – another reason schema-per-tenant is less common. But it can be done similarly by scripting through schemas.
Backward Compatibility: Regardless of model, strive for migrations that are backward compatible with the previous version of the app. Because in a deployment scenario, you might run migrations first then deploy code, or deploy code then run migrations, or deploy code gradually (if multiple instances) while migration is done. A good practice is to deploy schema changes that add new things first (code can start using them while still working with old), then remove old ones in a later release once no code uses them. This blue-green compatible schema approach ensures you can rollback a deployment without being stuck.
Branching and Migrations: If you maintain a release branch for an older version, mind that the database changes might not be compatible. If tenants on old version share a database with those on new, that’s not possible (they all share one schema). If each tenant separate, you could just not migrate Tenant X’s DB until they upgrade. But mixing versions concurrently is dangerous; better to orchestrate a tenant upgrade rather than run two versions on same schema.
DevOps Pipeline for Migrations: In Azure DevOps or GitHub Actions, you can have a step that runs a migration script or a .NET tool. Some teams generate raw SQL migration scripts (e.g. dotnet ef migrations script) and then run that on each database via an SQL command executor. This decouples app code from migration execution and is safer – you can preview the script. Others directly run DbContext.Migrate() in a loop via a custom tool (requires app code in the pipeline context). Either is fine with right checks.
Hotfixes to Database: If an urgent data fix or schema fix is needed for one tenant (say their DB got corrupted or needs special index), try to apply it through the same automation pipeline rather than manual, to keep track. Or at least record it. Ideally, ephemeral issues are solved by code, but e.g. if one tenant’s DB needs a cleanup script, consider writing a migration for it that only affects that DB (like conditional logic based on tenant id if within a shared DB context).
Hotfixes and Tenant-Specific Patches
When a critical bug arises, especially one affecting only a particular tenant or a subset, how do you release a fix quickly without risking others?
Hotfix on Shared Deployment: If all tenants share everything, a hotfix is just like any other deployment, but you may want to expedite it. Use branch or tag from the release, apply fix, run through tests quickly, deploy. All tenants get the fix (and any side effects). If the issue was only impacting one tenant due to their usage, others might not notice anything beyond an update. This is acceptable since it generally improves code for all (assuming no regressions).
Hotfix on Tenant-Specific Deployment: If Tenant X has their own environment and the bug is isolated to them, you have the option to deploy a fix just to Tenant X’s instance. For example, you spin a hotfix release from the code, and deploy it to Tenant X’s slot. Other tenants remain on the previous version. This is an advantage of isolated deployments – you can patch one without touching others. However, it comes at the cost of divergence. You then need to merge that hotfix into the mainline or ensure it goes into the next global release.
If you find you need to do this frequently (different tenants on different patch levels), it may indicate either that isolation is needed (due to custom code per tenant, which we argue against), or your deployment cadence to all is too slow so you’re micro-managing per tenant. Ideally, set up a pipeline that can target a specific tenant environment when needed. For example, a pipeline could have a parameter for TenantName, and you can manually trigger it to push a build to that tenant’s app service only.
Backward Compatibility for Hotfixes: If Tenant X is on version 1.2 and you haven’t moved them to 1.3 where bug is fixed, you might patch 1.2 branch. But you should still plan to bring them to 1.3 soon to avoid maintaining two versions. Communicate with customers about scheduling upgrades to minimize supported versions.
Blue/Green and Progressive Rollouts: An excellent practice to minimize the blast radius of a bad deployment is to do progressive rollout – which can be per tenant. For instance, you deploy the new release to a small set of tenants first (maybe internal test tenant or one friendly customer). Monitor it. Then deploy to the rest if all is well (or gradually increase). This can be done either by having multiple stamps and moving tenants between them, or if using feature flags, by enabling new code paths gradually. But at infrastructure level, blue-green deployment might not apply per tenant unless they’re isolated or you partition tenants for staging.
Database Hotfixes: If the bug is data-related for one tenant, you might run a one-off data correction script for that tenant’s DB. When doing so, ensure it doesn’t inadvertently affect others (which is easier if separate DB). If shared DB, include WHERE TenantId = X in any data updates obviously.
Emergency Feature Kill-Switch: Consider implementing a global feature flag that you can toggle off a problematic feature without full redeploy. For instance, if a new feature is causing errors, flip it off (via LaunchDarkly or config) for all or specific tenant(s). That buys time to issue a proper fix. This has saved many SaaS companies from outages – they deploy new code darkened behind a flag, and if something goes wrong, they just turn it off rather than rollback the entire deployment.
Continuous Monitoring: With multi-tenancy, incorporate per-tenant monitoring. If one tenant’s usage pattern triggers an issue, you want to catch it. Use logs or Application Insights with tenant context (e.g., include tenant id in log scope or telemetry). That way, you can often apply a fix for that tenant’s scenario proactively. Also, monitoring helps ensure that after a deployment, all tenants are functioning. Possibly implement a basic health check per tenant (like attempt a login or a simple API call for each tenant post-deploy, maybe via an automated script) to detect any tenant-specific configuration issues (e.g., maybe tenant X had a special config that didn’t play well with the new code – better to find out immediately).
Branch Strategy revisited for Hotfix: If using trunk-based, a hotfix might be just another commit on trunk if you deploy continuously. But if trunk has moved on (with features not ready to go live yet), you might create a hotfix branch from last release tag. Fix there, deploy that branch. Then merge that fix back to trunk (which now includes future changes). Feature flags help here: if trunk has half-done features, keep them off so you could theoretically deploy trunk. But that’s advanced; in practice many will cut a branch for the hotfix and then later merge.
In summary, the goal is to minimize the need for tenant-specific deviations by keeping tenants on a uniform codebase and using configuration to handle differences dotnetwisdom.co.uk. Use CI/CD pipelines that are flexible enough to deploy to one or all tenants. Test thoroughly, automate what you can (including multi-tenant scenarios in tests), and use feature toggles to decouple deployment from release. That way, you can deploy code to production (for all tenants) but control exposure. This model has been championed in modern SaaS because it allows quick recovery (toggle off) and rapid iteration without branching explosion.
Common Pitfalls and Best Practices
Building a multi-tenant SaaS is complex. Here we compile some common pitfalls to avoid and best practices to follow, gleaned from experience and industry guidance:
Pitfalls to Avoid:
- Insufficient Data Isolation: The worst-case multi-tenancy bug is one tenant seeing another’s data. Avoid this by design. Never rely solely on client-side filtering; always enforce tenant isolation on the server. Use database constraints or at least application-level safeguards like global query filters. For instance, forgetting to add
WHERE TenantId = ...in a query can leak data learn.microsoft.com. Mitigate by using ORMs with filters or writing a custom guard in your repository layer that always injects tenant criteria. Also be mindful of indirect leaks – e.g., logs or error messages that might contain IDs from other tenants. - Noisy Neighbour Neglect: If using shared resources, not monitoring or controlling per-tenant resource usage can lead to one tenant degrading service for others learn.microsoft.com. Pitfall: not implementing any form of rate limiting or partitioning. To avoid this, consider per-tenant throttling on APIs, use separate pools/partitions where possible (e.g., database resource governance, CPU quotas in containers, etc.), and monitor usage per tenant. The Azure architecture guide explicitly warns about performance issues from tenants affecting each other and suggests designing for isolation to acceptable levels learn.microsoft.com.
- Over-Customization per Tenant: It can be tempting to tweak the code for a specific client (“just this one if-statement for Tenant X”). This, if unchecked, leads to code spaghetti full of tenant-specific conditions and a de-facto forked codebase. It complicates testing and violates the whole benefit of multi-tenancy. Instead, generalize the need – if Tenant X wants a different workflow, can it be a config setting that others could also potentially use? Use feature flags or strategy patterns rather than hard-coding tenant IDs in code. If something truly unique is needed for one client, consider making it a separate service or plugin module rather than cluttering core logic. As a rule, avoid code forks for tenants – it’s an antipattern.
- Managing Tenants Manually: If your onboarding of a new tenant involves manual steps (creating DB by hand, configuring DNS by hand, etc.), that process doesn’t scale and is error-prone. Aim for automation from day one: e.g., a script or service that when a new tenant signs up, it programmatically creates their DB (or partitions), sets up default config, etc. The Azure guide recommends automating deployment and changes across tenants learn.microsoft.com. Not doing so is a pitfall that will bite once you have dozens of customers. Infrastructure as Code (IaC) and scripted processes are your friends.
- Lack of Tenant-specific Metrics and Logging: If you only monitor system-wide metrics (CPU, memory, overall request rate), you might miss that one particular tenant is experiencing errors or slowness. Always include a tenant identifier in your logs and metrics. For example, instrument your API to emit a metric “request count by tenant” or “error count by tenant”. Pitfall to avoid: finding out about an issue only when one tenant complains, because your aggregated monitoring showed everything was fine (as the other 99 tenants masked the one failing). Use correlation IDs and tenant IDs in logs; many logging frameworks allow scoping or enricher for that.
- Ignoring Compliance and Security Requirements: Different tenants might have different compliance needs (e.g., one might require data residency in EU, another might be fine in US). If you ignore this initially, it can become a big problem later. Design early for data partitioning by region if needed, and know your target customer base. Also, multi-tenancy raises security questions: ensure one tenant’s admin can never affect others. Test authorization thoroughly (simulate cross-tenant access attempts). Consider isolation at network level too if needed (some high-security tenants might want dedicated VPNs etc. – in Azure, you could integrate with their virtual network if needed using App Service VNET integration or similar).
- Unbounded Tenants on Shared Infrastructure: If all tenants share a cluster, one might onboard a huge client that outgrows the deployment capacity or violates assumptions (like data volume or traffic). Plan for scaling out. Maybe that means if a tenant exceeds X size, migrate them to their own deployment (vertical partitioning). But migrating on the fly is hard – think about the architecture so that it’s easier (for example, if each tenant’s data is mostly in one database, you could migrate that DB to another server; if all in one DB, it’s harder). Have clear limits per tenant and enforce them or be ready to scale infrastructure accordingly.
Best Practices:
- Centralize Tenant Management: Maintain a central place that maps tenant identifiers to their configuration – connection strings, any specific settings, domains, etc. This could be a
Tenantstable (like in that C# Corner example c-sharpcorner.com) or an in-memory dictionary loaded at startup from config. This registry makes it easier to on-board, off-board tenants and is referenced in your resolution middleware. It’s also helpful for operations (list all tenants, iterate to run a job for each, etc.). - Use Feature Flags and Config Strategically: As we discussed, these are powerful tools. Use feature flags to decouple deployment from feature release (so you can do safe deployments). Use config to handle per-tenant variations (so you don’t hardcode values). Just avoid overusing flags without cleanup – after a feature is fully rolled out to everyone, remove the flag in code to reduce complexity.
- Test with Multiple Tenants: In your development and staging environments, set up multiple dummy tenants to test isolation. For example, create “TenantA” and “TenantB” with different data and maybe slightly different settings, then run integration tests that ensure TenantA cannot access TenantB’s data, etc. Also test migrations on scenarios with many tenant databases (maybe simulate 100 small DBs to see if your migration script can handle it).
- Deploy Frequently in Small Batches: Frequent deployments reduce risk because the changes are smaller. Use techniques like blue-green deployments or deployment rings (a set of internal tenants first, then all). If you can, automate rollback – e.g., if new release causes errors above threshold, your pipeline or orchestrator should auto rollback to last known good version. Feature flags help here too (to disable the problematic component instead of rollback).
- Include Tenant in Audit Trails: If your app has auditing (who did what), include the tenant context. This not only is good practice but also if any cross-tenant data access were to happen, you’d see “User X of Tenant A accessed something of Tenant B” which should never appear, and that can alert you. Also, consider making audit logs available to each tenant (some SaaS allow tenants to see logs of actions in their org). Multi-tenancy shouldn’t break that – scope the view to their events.
- Ensure Idempotent and Safe Startup: When your app starts, if it needs to do initialization per tenant (like seeding a database), make sure it handles already-existing tenants cleanly. You don’t want, for instance, a deploy to re-run a tenant creation script and wipe data. Usually using migrations or checks prevents this, but it’s a reminder to handle those flows carefully.
- Resource Quotas: Consider implementing quotas per tenant (max API calls per hour, max storage etc.) and enforce them. This not only protects from noisy neighbors but also sets expectations and possibly monetization (e.g., if they want more, they pay more).
- Use Modern .NET and Azure Features: As of .NET 8, take advantage of any relevant improvements. .NET 8 has performance optimizations that benefit everyone, but also consider using Minimal APIs if appropriate – they can be structured to use the same middleware for multi-tenancy. Azure provides services like Azure Monitor with Application Insights multi-tenancy (you can use a property for tenant). Azure AD (Entra ID) now has features like cross-tenant access settings which might help if integrating with customers’ Entra tenants. Keep an eye on Azure’s SaaS-focused offerings – for instance, Azure AD B2C (or its successor) could manage external identities, or Azure Managed Tenants concept might evolve.
- Documentation and Transparency: Document for yourself (and maybe for customers) how your multi-tenancy works. For engineering, having a clear description of the isolation model helps onboarding new developers without mistakes. For customers, being transparent about how data is separated and secured across tenants can build trust – sometimes you might need to provide architecture details in security assessments. Being able to show that “each tenant’s data is tagged with a TenantId and we have automated tests plus database constraints to prevent leakage” can be a selling point.
- Regular Isolation Testing (Chaos Engineering): The Azure guide suggests using something like Azure Chaos Studio to simulate faults. One idea: simulate what happens if one tenant’s database goes down – does it affect others or can the app gracefully handle one tenant being unavailable? In a multi-tenant system, partial outages can happen (e.g., one tenant’s data partition is unhealthy). Design so that fails in one tenant don’t cascade. For example, if Tenant A’s DB is unreachable, that error should be handled (maybe show a maintenance page for Tenant A) but not crash the whole app or thread pool.
- Separate Critical Infrastructure when Needed: Sometimes mixing everything is not the best – for example, you might keep each tenant’s file storage separate in different containers or directories, both for security and ease of management (so you can give them a copy of their files easily or delete them completely on termination). Or use separate message queues for each tenant if you have asynchronous processing, to avoid one tenant flooding a queue and delaying others. These are design decisions that trade complexity for robustness.
By adhering to these practices, you’ll create a more stable, scalable, and secure multi-tenant system. As a final note, always stay updated on improvements in the .NET and Azure ecosystem that facilitate multi-tenancy. For instance, .NET continues to improve data access and performance which can benefit high-density multi-tenant scenarios; Azure regularly adds features for isolating and managing resources (like Azure SQL’s support for named replicas, or new security features in Entra ID for multi-tenant apps). Leverage these to continuously harden your SaaS architecture.
Building a multi-tenant SaaS application is certainly challenging, but with the right architecture and DevOps practices, it can provide tremendous leverage – one application serving many customers efficiently. To recap, choose a tenancy model that balances isolation and cost for your situation, implement robust tenant resolution and security checks, leverage configuration and feature flags for flexibility, and automate your CI/CD to manage deployments and migrations across tenants safely. By avoiding common pitfalls and following best practices, you can achieve a scalable and maintainable multi-tenant platform ready to grow with your user base. Good luck with your SaaS journey!

Leave a reply to Mastering Observability in .NET 8: Logging, Monitoring, and Tracing for Production-Grade Applications – DotNet Wisdom Cancel reply